New module EasyGraph for accessing Microsoft Graph from PowerShell

Microsoft Graph has been an increasingly important tool when working with automation tasks. With its many APIs, Graph has become a gem in the automation toolbox, with one single interface to interact with all sort of data.

To simplify access to Microsoft Graph, I have written a PowerShell module, EasyGraph. The module provides a simple way of connecting and querying Microsoft Graph, in a similar way as for example the AzureAD module. The module works cross-platform and the source code is available on GitHub. It is installed directly from PowerShell Gallery:

Install-Module -Name EasyGraph

The EasyGraph module allows several different types of authentication, both interactive and silent, purposed for automation and background jobs.

  • Certificate based authentication with thumbprint (Windows only)
  • Certificate based authentication with Pfx file
  • Username and password (Windows only)
  • Client credentials
  • Device Code

You also need to register an application in the Azure portal in order to use the module.  In the application you also have to delegate the permissions needed for your script.

Detailed information about the module is available in the EasyGraph repository on GitHub. Below is a simple example on how we for example could update some user attributes of all users in AzureAD.

# Load the module
Import-Module -Name EasyGraph

# We need the ClientId/AppId from the App you created in AzureAD
$MyApp = 'a72b9508-6cbc-4117-b6d7-ff69cf248290'

# Connect using the username+password method
Connect-EasyGraph -AppId $MyApp

# Define whe attributes we want to update
$NewAttributes = @{
    city       = 'Stockholm'
    postalCode = '11130'
}

# Get all users and loop through them
Invoke-EasyGraphRequest -Resource '/users' | Foreach-Object {
    # For each user, get the id ($_.id) and call Graph to set the new attributes
    Invoke-EasyGraphRequest -Resource "/users/$($_.id)" -Method PATCH -Body $NewAttributes
}

# All done, disconnect
Disconnect-EasyGraph

With this simple example it is now up to you to come up with the next big thing, that unleash the power of Microsoft Graph. Happy coding!

/ Andreas

First look at the new Azure Firewall Preview

Until now, third party devices (NVAs) have been required to have a “real” firewall in Azure in addition to the basic functionality provided by Network Security Groups (NSG’s). Yesterday however, Microsoft released their stateful firewall service in Azure in public preview, simply named Azure Firewall.

Does this mean the end for third-party appliances with firewall functionality in Azure? In this post I will try to answer what scenarios Azure’s new firewall covers in this preview and how to get started and try it out in your environment.

The Basics
First of all, it is important to understand that the firewall in this preview is only intended to be used to handle outbound traffic to the Internet. If you want to protect your resources that are published to the internet, you can use for example Application Gateway with WAF and other similar services.
Below capabilities are available in the public preview:
  • Outbound FQDN Filtering
    • FQDN filtering is one of the most common asks that customers have for outbound filtering to the Internet, as it becomes very difficult to maintain lists of IP addresses/subnet for internet-based services. Only for http/https traffic at this time.
  • Network traffic filtering rules
    • Traditional access lists with the ability to control traffic on protocol/ip /subnet/port
  • Outbound SNAT Support
    • Obviously something that needs to be supported to handle outbound traffic in a centralized way 🙂
  • Azure Monitor logging
    • Logging is one of the most important parts when talking about security in general. All new Azure service use Azure Monitor for logging, Azure Firewall is no exception. Accepted and denied connections based on network and application rules are logged.
As you can see, there are quite sparse capabilities in the preview, but as with all other services, I expect more and more features to come over time.

Sizing and cost
Unlike Application Gateway / WAF, where you need to select the number of instances and instance sizes, Azure Firewall is highly available by default and scales automatically based on demand.

NO MORE MANUAL SCALING!!! 🙂

When it comes to charges, a security boundary fee will be charged per logical firewall unit, in addition to a Data Processing fee that is billed based on ingress and egress data transfer. You’ll find updated pricing at https://azure.microsoft.com/en-us/pricing/details/azure-firewall/.

Getting started
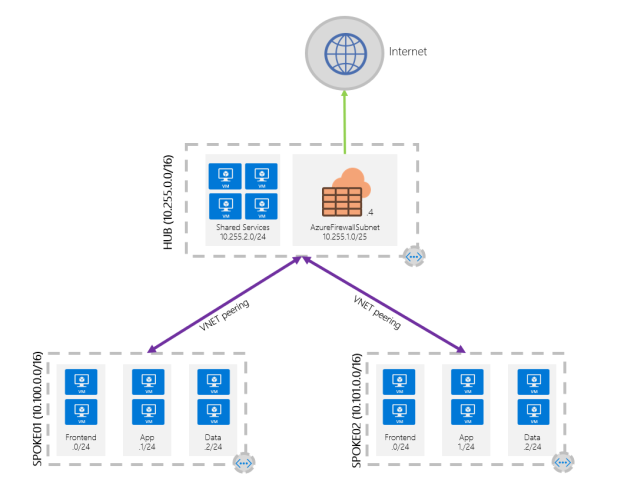
In my test I have chosen to deploy the firewall into the hub in a standard hub and spoke network topology, which I think will be the most common way to deploy the firewall.
2018-07-13_12-53-34
Prerequisites
  • Since it is in preview, you first have to enable the Azure Firewall public preview by registering the feature with the following PowerShell commands. It will take up to 30 minutes for feature registration to complete
Register-AzureRmProviderFeature -FeatureName AllowRegionalGatewayManagerForSecureGateway -ProviderNamespace Microsoft.Network

Register-AzureRmProviderFeature -FeatureName AllowAzureFirewall -ProviderNamespace Microsoft.Network
    • The firewall needs one dedicated subnet, minimum /25 . It is a fairly large subnet, but suppose it’s because it needs address space to scale out without any restrictions. It isn’t very clear in the documentation and it will not complain about this until you actually deploy the firewall. The subnet must be named AzureFirewallSubnet.

Deploying the firewall
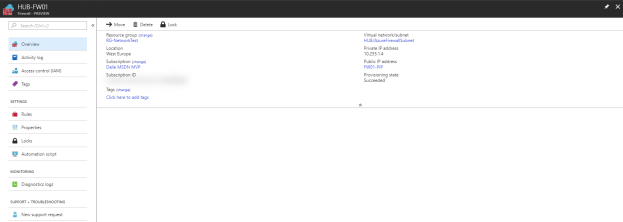
The firewall service integrates nicely directly in the VNet settings context and it i just to fire off a deployment directly from there.As seen above, except for the firewall subnet and the standard SKU public IP address, there are very few things that can be configured during deployment.

It only took 5-6 minutes to deploy the firewall which is significantly faster than my experience is with eg. Application Gateways and VPN Gateways. Good for us stressed consultants 🙂
Putting it to the test

User Defined Routes
To route all outbound internet traffic from the spokes via the hub through Azure Firewall, I first created a User Defined Route (UDR) for 0.0.0.0/0 and associated the spoke subnets to that. Depending on how your traffic flow, you might want another configuration.
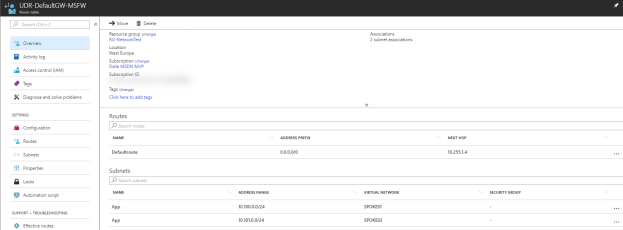
Note that until you have created your default rules in the firewalls, the machines in these subnets will not be able to access anything.

Management experience – creating basic rules
Application and network rules are stored in something called rule collections. A rule collection is a list of rules that share the same action and priority. A network rule collection is a list of network rules and an application rule collection is a list of application rules. Network rule collections are always processed before application rule collections. All rules are terminating, so if a match is found in a network rule collection, the following application rule collections for the session are not be processed.

Except from the built-in collection for infrastructure FQDNs used for Compute, Storage and Diagnostics that are allowed by default, all connections are denied by default, so we are really in full control of our outbound traffic here.

The rule management experience is fairly basic but works well. It takes up to a minute to create/edit a rule, much better then Application Gateway but might still be a bit frustrating if making a lot of changes in the GUI. The other thing I feel is missing is the possibility to create host groups for subnet or vm/host and apply the rules to those instead of ip’s/subnets. That would make it a lot easier to get an overview of whats allowed in a specific rule.

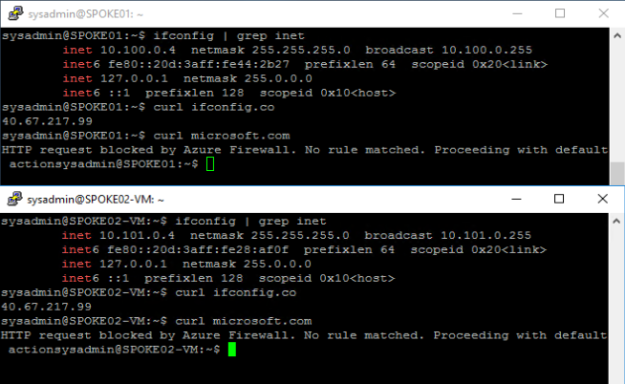
I created one default network rule collection and one application rule to only allow SSH, DNS and HTTP/S traffic to ifconfig.co from my spoke VNets.

As seen in the screenshot below, both machines used the same external ip address when browsing the internet. You can also see that ifconfig.co was allowed but microsoft.com was denied with the message  “HTTP request blocked by Azure Firewall. No rule matched. Proceeding with default actions”. 
Spoke to spoke communication 
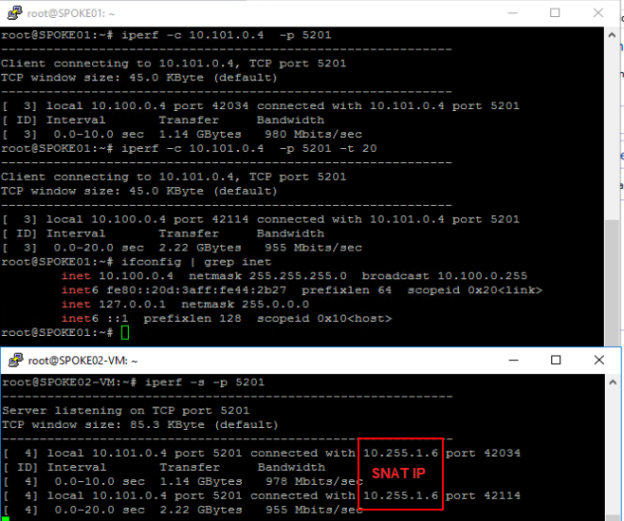
Another common scenario commonly handled by an NVA is spoke two spoke traffic. Obviously it is also possible to solve this with VNet peering, but by routing the traffic through the hub we get a much better and more granular control. To try out this scenario I created an additional rule collection allowing ICMP and TCP 5201 (iPerf) between the subnets and it worked well. It is still doing SNAT and not routing so the connections will come from the firewall and not from the true source ip. I could also see that the connections sometimes came from different ip’s (different load balanced firewall nodes).


Latency became slightly more impacted than I expected routing the traffic through the hub, but generally something that is possible to live with.

Pushing the limits – throughput test
Since it also supposed to unlimited capacity based on demand, I also took the opportunity to do a basic throughput test between the hosts in my environment. Between my lightweight B2s machines, I almost got 1Gbit/s which I consider to be more than acceptable. Your mileage may vary depending on the amount of connections etc. but it looks really promising.
Conclusion 
Even though it is currently a minimal viable product and a first public preview of the service, I have to say that overall, I am pleasantly surprised at how well the firewall actually performed. Obviously, some polishing is required in user interfaces, logging and additional capabilities before it is a full-fledged cloud-native firewall, but it definitely has potential. Definitely a good complement and sometimes even a replacement of the traditional NVAs.

Just ping me on Twitter if you have questions or comments!

/Johan


Beyond the supported – Cross forest style Exchange Online Migration

Migration and consolidation projects always put our skills to the test and in some cases forces us to do things that are not fully supported. But sometimes, the end justifies the means.

Some time ago, I did an Exchange Online onboarding project in a quite complex scenario, at least in terms of the identities. 10+ Active Directories and almost as many Exchange environments. On top of that, due to several reasons, it was not possible to create trusts between the different directories. Not the easiest starting point…
Looking at all different options we agreed upon to synchronize one of the directories to Azure AD. This meant that all users not in that directory were to get new accounts, effectively taking the first step towards a common environment.

– Identites – check!

The next step were to determine the migration strategy for the Exchange environments that was ranging from Exchange 2007 -> 2013. Given the quite complex scenario without trusts between the environments, our minds were set to use a third-party tool to do all the migrations. I always like challenging the obvious path, so I wanted to see if it was possible to do native mailbox moves even though there was no possibility to use the regular Hybrid Configuration Wizard.

Guess what – following cross-forest migration principals and copying the relevant attributes between the environments worked great! Cutting $100k in third-party software licensing costs from the project budget is never a bad thing either 🙂

A little simplified, we ended up with a scenario / environment looking like below:

fakehybrid

Remember that this is a quite complex scenario where you have to do most preparations “manually”, so don’t try this unless you really need this kind of scenario. Also note that the same approach works in a staged migration scenario from Exchange 2003/2007.

Assumptions:

  • You have a way to match users between the different environments when moving the attributes.
  • The target directory/forest has been prepared with the Exchange server schema.
  • SMTP/Port 25 is open from the source Exchange environments for outgoing coexistence mailflow.
  • You are in control of your incoming mailflow as well as AutoDiscover, depending on how your environment/domains look like. 🙂
  • This method will be used to migrate mailboxes, not for long-term coexistence. If you have separate SMTP domains per environment, free/busy sharing can be configured if needed.

Preparation steps: 
Source Exchange Environment:

1. Add the tenant routing domain (tenant.mail.onmicrosoft.com) as an accepted domain. Also create a send connector to solve outgoing email in the transition
2. Add the routing email address (smtp:samaccountname@tenant.mail.onmicrosoft.com) to all users in scope for migration.
3. Export the attributes needed to perform the migration from the source Exchange environment. The following attributes are needed for a successful migration. I have used Export-Clixml instead of a CSV-file for simpler handling importing back the Guid Attributes.

  • mail
  • mailNickname
  • proxyAddresses
  • msExchMailboxGuid       
  • msExchArchiveGuid  
  • legacyExchangeDN          
  • msExchRecipientDisplayType
  • msExchRecipientTypeDetails

4. Export mailbox permissions/calendar permissions for users/shared mailboxes if needed.
5. Enable MRSProxy in the Exchange Environment. Also create a service account with at least Recipient Management permissions to use setting up the migration endpoint in Exchange Online.

Target Active Directory / Exchange Online environment:
1. Set up an “Exchange Remote” migration endpoint towards the MRSProxy earlier created.
2. Import the attributes earlier exported in the user directory.
3. After a successful directory synchronization, verify that the users in scope shows up as Mail Users in Exchange Online. If you did the Exchange schema update after you installed AADConnect, don’t forget to refresh the schema there as well, otherwise you won’t synchronize the imported attributes.
4. Perform a test move and verify that everything works as expected. Just as in the case of a “normal” move, the mailbox will be converted to a remote mailbox after the move has been completed.

Migration/post migration steps 
1. Plan and execute your migration batches. Remember that this is not a regular hybrid environment with free/busy etc., so plan your batches accordingly.
2. Import eventual mailbox/calendar permissions after each batch.
3. Switch MX/Autodiscover to Office 365
4. Decommission the source Exchange environment.

Summary
One approach does not fit all and sometimes you have to think a little bit out of the box. I hope this post was interesting and that it might give you some creative ideas running in to similar scenarios. For any questions or feedback, feel free to comment here or ping me on Twitter, @daltondhcp.

/Johan

Create simple PowerBI reports for Intune through the Microsoft Graph

Reporting, playing with data and creating all kinds of charts is always fun. PowerBI is probably the simplest playground doing it.

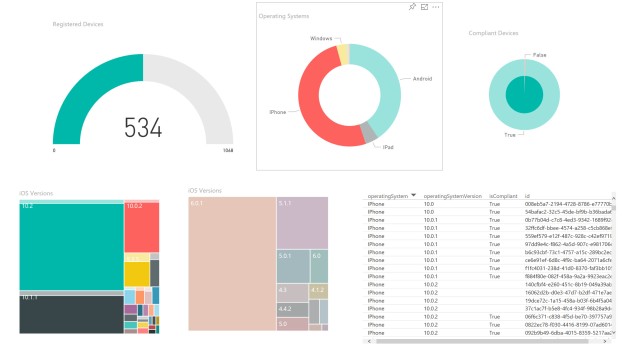
While doing an O365 / EMS project, management wanted a simple dashboard to keep track of different KPI’s in the project. Example on the data they wanted was number of onboarded users to Exchange Online and enrolled devices in Intune. The Office 365 adoption content pack is in preview and provides lots of insights to how the services are used (in some cases, maybe too much)… In this specific case, we also had an Intune Cloud Only environment, so our reporting as well as delegation possibilites were very limited.

2017-01-03_13-34-12

Luckily enough, some Intune data (and its growing and growing) are nowdays exposed through the Microsoft Graph for us to consume with PowerBI directly with REST and OData.

In my example, I will simply get all registered devices to create my report. To find what possibilites there are, look in to the Microsoft Graph Documentation. If you want to use query parameters, you’ll find the supported ones here.

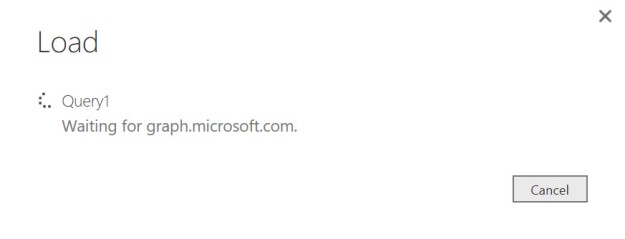
1. First connect and load the OData feed from Microsoft Graph. In my case I am using the https://graph.microsoft.com/v1.0/devices endpoint. Sign in with an organizational account or app that have appropriate permissions.
2017-01-03_14-36-01

2017-01-03_14-45-102017-01-03_14-45-30
2017-01-03_14-50-39 2017-01-03_14-50-55

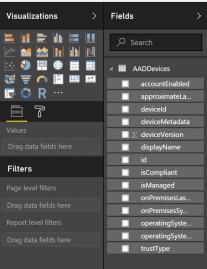
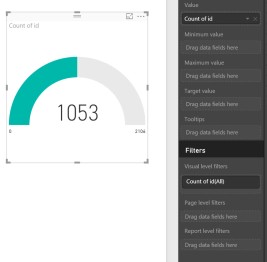
2. After the data has been loaded successfully in to PowerBI it’s time to create som nice charts!
2017-01-03_14-54-28
2017-01-03_14-56-41
2017-01-03_14-57-46


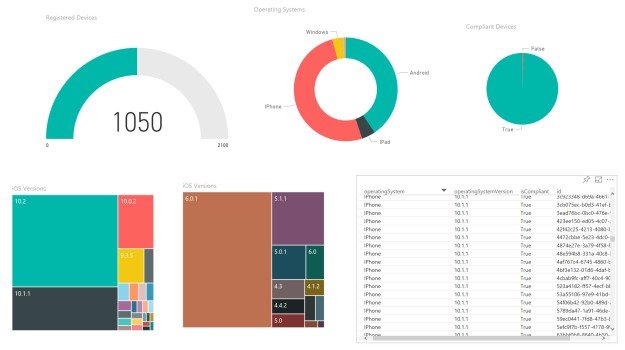
Result – My “finished” basic report

2017-01-03_15-06-09
2017-01-03_15-06-30

This was a simple example how to get started with PowerBI and the Microsoft Graph – hopefully you’ve now got some inspiration on what possibilites there are with just five minutes effort. Imagine what you could do if you really put in some time. 🙂

Happy reporting!

/Johan

ADFS Customization – add custom help form to the login page

In the spirit of sharing more “not-so-evergreen” ADFS customizations, I wanted to share another customization request I got a while ago.
The case was very simple, they customer wanted to fit more end-user information in the login flow than the ADFS login page could fit without sending the user to another page.
Onload.js to the rescue again! This time we are using it to simply create an additional form where we present additional information when clicking on the help button.

My example looks like this:
2017-01-01_21-06-44
2017-01-01_21-36-25
2017-01-01_21-36-43

Note that everything is in the JavaScript code, including the help page text. If preferred, that part could be loaded from another location.

Customize ADFS with help page (yes, I should move my content to GitHub)

// Author: Johan Dahlbom
// Blog: 365lab.net
// Twitter: @daltondhcp
// Get DOM elements and save as objects
var loginMessage = document.getElementById('loginMessage'),
    loginArea = document.getElementById('loginArea'),
    loginForm = document.getElementById('loginForm'),
	userNameInput = document.getElementById('userNameInput'),
    helpContent,
    usernameLink,
    passwordResetLink,
	errorText = document.getElementById("errorText"),
	introArea = document.getElementById("introduction"),
	authArea = document.getElementById("authArea");

var showingHelper = false,
    showingLoginform = false;

// CREATE CONTENT FUNCTIONS

function createHelpersForLoginForm() {
  //Create the hyperlink to the help form
  passwordResetLink = document.createElement('a');
  var linkText = "Need help?";
  passwordResetLink.appendChild(document.createTextNode(linkText));
  passwordResetLink.title = linkText;
  passwordResetLink.href = "#";
  passwordResetLink.onclick = toggleHelpContent;

  loginArea.appendChild(passwordResetLink);
}

function createHelpContent() {
  if (!authArea) {
    return;
  }
  helpContent = document.createElement("div");
  helpContent.style.display = 'none';

  helpContent.innerHTML = '\
    <br><br>\
    <h2><strong>What is my username?</strong></h2>\
    <p>Your username is the same as your email address. Example: ann.andersson@365lab.net</p><br>\
    <h2><strong>What is my password?</strong></h2>\
    <p>This is a secret chosen by you. It would not be a secret if we told you. If you forgot your password, you can reset it <a href="https://passwordreset.microsoftonline.com/?whr=365lab.net" target="_blank">here</a><br><br>\
    </p>\
    <h2><strong>Support</strong></h2>\
    <p>If you have any issues or questions, please contact our helpdesk at 555-GET-HELP or <a href="mailto:support@365lab.net">support@365lab.net</a><br><br><br></p>\
    ';

  // Link for close help
  var closeHelpContentLink = document.createElement('span');
  closeHelpContentLink.innerHTML = "Back to the login form";
  closeHelpContentLink.className = "submit";
  closeHelpContentLink.onclick = toggleHelpContent;

  // Duplicate it to have one before the content as well.
  // Uncomment these lines if the help  content grows.
  // var closeHelpContentLinkUpper = closeHelpContentLink.cloneNode(true);
  // closeHelpContentLinkUpper.onclick = toggleHelpContent;
  // helpContent.insertBefore(closeHelpContentLinkUpper, helpContent.firstChild);

  helpContent.appendChild(closeHelpContentLink);

  authArea.appendChild(helpContent);
}

function updateUI() {
  // Check for DOM errors
  if (!loginForm || !helpContent) {
    return;
  }

  if (showingHelper) {
    openHelpContent();
  } else {
    closeHelpContent();
  }
}

function toggleHelpContent() {
  showingHelper = !showingHelper;

  updateUI();
}

function openHelpContent() {
	helpContent.style.display="block";
	loginArea.style.display="none"
}

function closeHelpContent() {
	helpContent.style.display="none";
	loginArea.style.display="block"
}

// Create DOM elements 
createHelpersForLoginForm();
createHelpContent();
updateUI();

As usual, you update onload.js with the Set-AdfsWebTheme cmdlet.
Hope this will be useful for some of you guys! If you have questions, ping me o twitter or email!

Thanks,
/Johan

ADFS Customization – Branding per domain for Azure AD/Office 365

Branding your services can be very important for many reasons where recognizability and company profile are the most common ones. Making the marketing department happy is not a bad thing either.
With ADFS in Server 2016, the capability to do branding on a relying party basis was added. This was something that you in 2012 R2 needed to use JavaScript to achieve. Please note that the customizations in this post works both in 2012R2 and 2016.

While the default branding options above fit most customer needs, I recently had a customer case where two municipalities were onboarding to Office 365. Since they were sharing the same AD domain, they also shared their ADFS environment. You can probably guess where we are going now… They want continue using the same ADFS environment but have different branding depending on the login domain in Office 365 / Azure AD. I have got this request before, but have usually talked out the customers of going that path and instead agree upon common branding, but not this time. Not the most evergreen solution, but all for the customers, right? 🙂

There is a uservoice for the same request using managed domains directly in Azure AD – so clearly this is not the first time this has come up.

OVERVIEW
We will customize onload.js to apply different branding depending on the Office 365 / Azure AD domain used to login.
If browsing /idpinitiatedsignon directly or using another RP than Azure AD/Office 365, the default branding should apply. In my example, I will use the domains dom1.365lab.net and dom2.365lab.net. I assume that basic branding/webtheme already is in place.

The branding will apply in the following scenarios:

UPLOAD LOGO AND ILLUSTRATION
Upload the logos and illustrations as in my example script below. For performance and looks, follow the recommendation on sizes etc. on this TechNet page. If you have many domains, using some kind of naming convention might also be a good idea ;-).

$WebThemeName = "365lab"
#The pictures to upload
$UploadData = @{
  logo = @('C:\temp\Branding\dom1.365lab.net_logo.png',
           'C:\temp\Branding\dom2.365lab.net_logo.png')
  illustration = @('C:\temp\Branding\dom1.365lab.net_illustration.jpg',
                  'C:\temp\Branding\dom2.365lab.net_illustration.jpg')
}                                                                                                              
#Loop through the image HT and upload the files accordingly
foreach ($ImageType in $UploadData.Keys) {
  $UploadData[$ImageType] | ForEach-Object -Process {
    $FileName = $_.Split('\')[-1]
    Set-AdfsWebTheme -TargetName $WebThemeName `
                      -AdditionalFileResource @{
                        Uri = '/adfs/portal/{0}/{1}' -f $ImageType,$FileName
                        Path = $_.ToString() 
                      } 
  }                  
}                                                                                                                                                                                                                               

CUSTOMIZATION OF ONLOAD.JS
The JavaScript basically loops through an array and checks if the request has been referred from any of the domains in scope for customizations. In the example, the username placeholder and the login message are customized based on the “domainconfig” data as well. If you don’t know how to export/import onload.js to ADFS, looking in to this article prior doing any changes might be a good idea.

//Variables
var locationUrl = window.location.href.toLowerCase(),
	referrerUrl = document.referrer.toLowerCase(),
    logoDomain = document.getElementById('header'),
    loginMessage = document.getElementById('loginMessage'),
    userNameInput = document.getElementById('userNameInput'),
    domainconfig = [
        {domain:"dom1.365lab.net", companyName: "365lab Domain 1", logo:"dom1.365lab.net_logo.png", illustration:"dom1.365lab.net_illustration.jpg"},
        {domain:"dom2.365lab.net", companyName: "365lab Domain 2", logo:"dom2.365lab.net_logo.png", illustration:"dom2.365lab.net_illustration.jpg"}
    ];

function checkUrlForDomain(domainName) {
  return locationUrl.indexOf(domainName) > -1 || referrerUrl.indexOf(domainName) > -1;
}

for (var j = 0; j < domainconfig.length; j++){
  var domainName = domainconfig[j].domain;
  if (checkUrlForDomain(domainName)) {
     var logo = domainconfig[j].logo;
     var illustration = domainconfig[j].illustration;
     var companyName = domainconfig[j].companyName;

     //for troubleshooting purposes
     //console.log(domainName); 
     //console.log(logo);
     //console.log(illustration);

     //Change Logo
     logoDomain.innerHTML = "<img class='logoImage' src='/adfs/portal/logo/" + logo +"' alt='" + domainName + "'" +">"
     //Change illustration
     document.getElementsByTagName('style')[0].innerHTML = ".illustrationClass {background-image:url(/adfs/portal/illustration/" + illustration + ");}"; 
     //Change login message
     loginMessage.innerHTML = "<h2>Sign in with your " + companyName + " account </h2>" ;
     //Change username placeholder
     userNameInput.placeholder = "firstname.lastname@" + domainName ;
  }
}

After updated onload.js with your code, upload the changes to your webtheme with the following PowerShell cmdlet.

$WebThemeName = "365lab"
Set-AdfsWebTheme -TargetName $WebThemeName `
                 -AdditionalFileResource @{
                    Uri="/adfs/portal/script/onload.js"
                    path="C:\temp\script\onload.js"
                  }

RESULTS
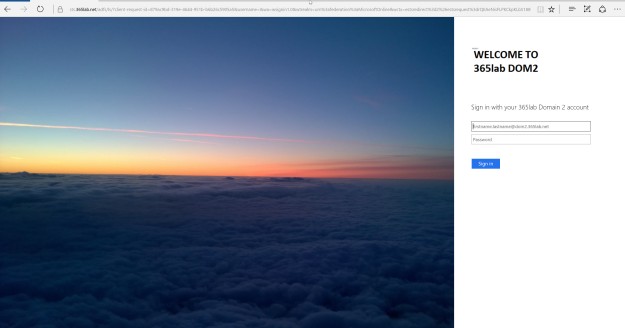
Voila! We now have different branding in our ADFS depending on the domain suffix entered in Office 365 / Azure AD. Note that the code won’t change branding if you change the domain suffix in the username field after hitting the ADFS farm.

idpInitiatedSignOn
2016-12-30_11-00-39
Browsing outlook.com/dom1.365lab.net
2016-12-30_10-59-33
Browsing outlook.com/dom2.365lab.net
2016-12-30_11-00-16

Good luck with your branding and as always, let me know if you have feedback!

Happy new year!

/Johan

Assign individual parts of licenses with Azure AD PowerShell V2.0

Azure AD PowerShell V2 has been in GA for almost a month now. Even though some features (like converting a domain to federated) are missing as of now, it is really time to start to rewrite all those old MSOnline module scripts as AAD PS PM Rob de Jong reminded me of this thursday.

Since licensing still is the most important task to automate in customer environments I thought it was a good idea to share some of the basics on how to licensing works in V2.0. Some day, when ‘Azure AD Group Based licensing’ is in place, we can get rid of most of these these licensing scripts.

Since most of my customers rarely roll out all services at once, I thought it was a good idea to show you how to roll out a few serviceplans at a time with Azure AD PowerShell V2.0. If you want to look in to the basics, fellow MVP Simon Wåhlin wrote a great post about this a month ago.

Find your LicenseSku’s and ServicePlans:
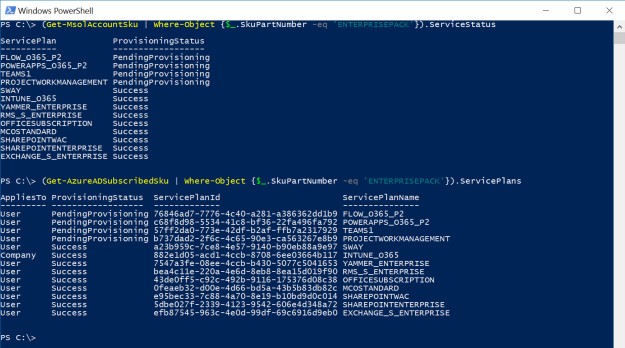
Luckily enough, the equivalent to Get-MsolAccountSku, Get-AzureADSubscribedSku gives us pretty much the same information as its predecessor.
aadsku
As seen in the screenshot, we can still identify the licenses with their partnumber even though we need the SkuId’s when assigning the licenses later which is really helpful converting your old scripts.

Finding the individual services is as easy, you only need to look in to the ServicePlans property instead of ServiceStatus. As with the base license, you’ll need to use the ServicePlanId of the specific plan if you want to disable it.
serviceplans

Putting it together and assign individual ServicePlans of a license:
In my example, I will enable a non-licensed user an E3 that has Exchange Online, Skype for Business and Office 365 ProPlus enabled. In staged onboarding cases usually choose the ones to enable in my scripts instead of hard coding the disabled ones, since Microsoft tend to add new serviceplans from time to time (Teams, PowerApps, Flow etc.). You can of course do it the other way around if that fits your organization better.
Note that it is still a requirement to assign the UsageLocation on the user before assigning the license.

#The user that will get a license
$UserToLicense = Get-AzureADUser -ObjectId "johan@365lab.net"

#Define the plans that will be enabled (Exchange Online, Skype for Business and Office 365 ProPlus )
$EnabledPlans = 'EXCHANGE_S_ENTERPRISE','MCOSTANDARD','OFFICESUBSCRIPTION'
#Get the LicenseSKU and create the Disabled ServicePlans object
$LicenseSku = Get-AzureADSubscribedSku | Where-Object {$_.SkuPartNumber -eq 'ENTERPRISEPACK'} 
#Loop through all the individual plans and disable all plans except the one in $EnabledPlans
$DisabledPlans = $LicenseSku.ServicePlans | ForEach-Object -Process { 
  $_ | Where-Object -FilterScript {$_.ServicePlanName -notin $EnabledPlans }
}

#Create the AssignedLicense object with the License and DisabledPlans earlier created
$License = New-Object -TypeName Microsoft.Open.AzureAD.Model.AssignedLicense
$License.SkuId = $LicenseSku.SkuId
$License.DisabledPlans = $DisabledPlans.ServicePlanId

#Create the AssignedLicenses Object 
$AssignedLicenses = New-Object -TypeName Microsoft.Open.AzureAD.Model.AssignedLicenses
$AssignedLicenses.AddLicenses = $License
$AssignedLicenses.RemoveLicenses = @()

#Assign the license to the user
Set-AzureADUserLicense -ObjectId $UserToLicense.ObjectId -AssignedLicenses $AssignedLicenses

In the latest preview version of the module (2.0.0.44) that I used when writing the post, I didn’t manage to assign a license to a new user without defining the RemoveLicenses property of the AssignedLicenses object.
2016-12-25_13-21-58

Verifying the licenses in the portal (yeah, could of course have done that with PowerShell as well.), it looks just as expected. If I wanted to enable more plans for the user I could just change the EnabledPlans array and run the script again.
2016-12-25_13-30-16

Summary
Azure AD PowerShell V2.0 gives us all needed functionality to keep automating our license assignment in Azure AD. It might take you a bit longer to learn it since it is somewhat more “PowerShelly” with the different objects used to assign the licenses but apart from that, I really like it. I have not done any scientific tests (might do), but it seems like it is also much faster using the Graph API endpoints than the old endpoints doing different actions against Azure AD.
I will follow this post up with hopefully new and updated versions of my larger and more advanced scripts built on the old module.

Let me know if you have questions!

/Johan
Common questions using Office 365 with ADFS and Azure MFA

Azure Multi Factor Authentication (MFA) is a great service that has been included in Office 365 for almost 2,5 years. The adoption has really been great – at least from an admin user perspective where 99% of my customers admins have it enabled (I usually force them).
From an end user perspective we have more technical and informational challenges, which means that the adoption has not been as great as on the admin side. Hopefully the new shiny Conditional access policies for specific workloads will boost the adoption a bit.

The purpose of this post is to share the most common questions I get from customers about using Azure MFA included in Office 365 (in most cases in combination with ADFS).

Q: Can we pre-stage the MFA authentication methods so the end user doesn’t have to enroll after being enabled for MFA?
2016-07-15_12-56-53
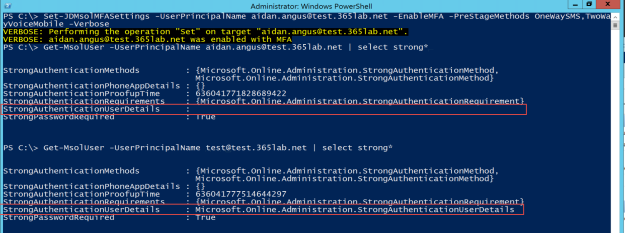
A: As of now, unfortunately no – I tried to build a PowerShell function to pre-populate the authentication methods if the user already had a mobile phone number. I was fooled and thought it worked, but when I tried on a user that never had enrolled MFA before, it failed. Troubleshooting further, the required MFA property “StrongAuthenticationUserDetails” is not possible to pre-populate programmaticly, yet. Maybe the new AzureAD module can help here in the future.
2016-07-15_13-04-332016-07-15_13-10-20
Conclusion – we have to instruct our users to enroll for MFA.

Q: Can we prevent MFA from kicking in when authenticating from our internal network?
A: Absolutely – There are some options depending on if you have Azure AD Premium or not.

With Azure AD Premium
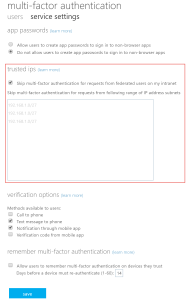
Here you can choose to “white list” your external IP addresses (which of course works with or without ADFS), or check the “Skip multi-factor authentication for requests from federated users on my intranet” checkbox. This will make Azure AD decide about MFA based on the insidecorporatenetwork claims issued by your own ADFS.
2016-07-15_13-32-05
The following PowerShell rows will add the required Issuance Transform Rules to your Azure AD RP.

$ByPassMFAClaims = @"
@RuleName = "Passtrough - InsideCorporateNetwork"
c:[Type == "http://schemas.microsoft.com/ws/2012/01/insidecorporatenetwork"]
 => issue(claim = c);

@RuleName = "Passtrough - PSSO"
c:[Type == "http://schemas.microsoft.com/2014/03/psso"]
 => issue(claim = c);
"@
$AzureADRP = Get-AdfsRelyingPartyTrust -Name "Microsoft Office 365 Identity Platform" 
Set-AdfsRelyingPartyTrust -TargetName $AzureADRP.Name `
                          -IssuanceTransformRules ($AzureADRP.IssuanceTransformRules + $ByPassMFAClaims)

Without Azure AD Premium
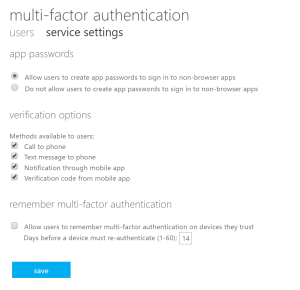
Without Azure AD Premium we don’t have the same choices in service settings.
2016-07-15_13-30-57
We can however achieve the same result, but instead of passing through the insidecorporatenetwork claims, we use it in ADFS and “tell” Azure AD that MFA is already taken care of. This can be done with the claim rules as below.

$ByPassMFAClaims = @"
@RuleName = "Bypass MFA from inside - Without Azure AD Premium"
EXISTS([Type == "http://schemas.microsoft.com/ws/2012/01/insidecorporatenetwork", Value == "true"])
 => issue(Type = "http://schemas.microsoft.com/claims/authnmethodsreferences", Value = "http://schemas.microsoft.com/claims/multipleauthn");

@RuleName = "Passtrough - PSSO"
c:[Type == "http://schemas.microsoft.com/2014/03/psso"]
 => issue(claim = c);
"@
$AzureADRP = Get-AdfsRelyingPartyTrust -Name "Microsoft Office 365 Identity Platform" 
Set-AdfsRelyingPartyTrust -TargetName $AzureADRP.Name `
                          -IssuanceTransformRules ($AzureADRP.IssuanceTransformRules + $ByPassMFAClaims)

Q: Do we really need to use the f****** app passwords?
A: Not really anymore, at least not if you are using ADFS. I usually turn it off.
First of all most rich clients (Including Outlook/SfB on mobile devices) do now support Modern Authentication (ADAL), which means they can handle MFA out of the box. So as long as you have updated clients, you most often only need to handle ActiveSync (native mail clients in all kinds of devices). My approach here is usually to exclude them from MFA to get rid of the app password need, but enable conditional access in order to control the devices.

Below you find a claims rule for the ActiveSync protocol that issues the multipleauthn claim which Azure AD will honor by skipping MFA for the request.

$Claims = @"
@Claims= "Bypass MFA for ActiveSync"
EXISTS([Type == "http://schemas.microsoft.com/2012/01/requestcontext/claims/x-ms-endpoint-absolute-path", Value=="/adfs/services/trust/2005/usernamemixed"]) && 
EXISTS([Type == "http://schemas.microsoft.com/2012/01/requestcontext/claims/x-ms-client-application", Value =~"^(Microsoft.Exchange.(Autodiscover|ActiveSync))$"]) 
=> Issue(Type = "http://schemas.microsoft.com/claims/authnmethodsreferences", Value = "http://schemas.microsoft.com/claims/multipleauthn"); 
"@
$AzureADRP = Get-AdfsRelyingPartyTrust -Name "Microsoft Office 365 Identity Platform" 
Set-AdfsRelyingPartyTrust -TargetName $AzureADRP.Name `
                          -IssuanceTransformRules ($AzureADRP.IssuanceTransformRules + $Claims)

Please note that additional rules may be needed depending on if you have an Exchange or Skype for Business Hybrid environment.

Q: Can we combine Azure MFA with our already implemented on-premises MFA solution?
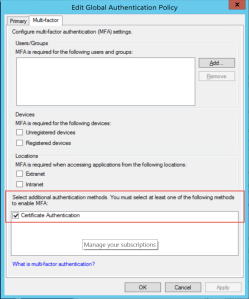
A: It works fine to combine Azure MFA with any MFA solution that integrates with ADFS. The only thing you need to do is issue the authnmethodsreferences on the Azure AD RP to prevent users from getting “Double MFA” like SmartCard + Azure MFA. 🙂 For example, if I have Cert Auth as an enabled MFA provider as below, I only have to authenticate with my VSM/SmartCard even if MFA is enabled on the user.
2016-07-15_14-27-41
The needed claims rule looks like this:

$Claims= @"
@RuleName = "Passthrough - MFA"
c:[Type == "http://schemas.microsoft.com/claims/authnmethodsreferences"]
 => issue(claim = c);
"@
$AzureADRP = Get-AdfsRelyingPartyTrust -Name "Microsoft Office 365 Identity Platform" 
Set-AdfsRelyingPartyTrust -TargetName $AzureADRP.Name `
                          -IssuanceTransformRules ($AzureADRP.IssuanceTransformRules + $Claims)

The above also works with the new Conditional Access policies for Exchange and SharePoint online.

Wrap up
Hopefully this post has given you some good insights what to think about implementing Azure MFA for Office 365. It is not a complete walk in the park, but it’s definately doable for most organizations.
As always, there are lots of if’s and but’s in all different environments. If I have missed something or if you have other, more specific questions, let me know!

/Johan

How to resolve “We’ve run into a problem with your Office 365 subscription” with PowerShell

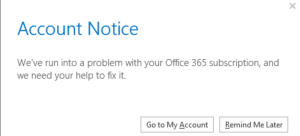
A colleague of mine performed a tenant to tenant migration a while ago. After the switchover to the new tenant, almost all users Office 365 ProPlus installations started to complain with the error message “We’ve run into a problem with your Office 365 subscription”. 2016-07-13_21-29-33
Signing out/in trying to activate the installation again didn’t help and after a while he found a solution at Jaap Wesselius blog.

The solution was to run the OSPP.vbs script located in the Office installation folder as in the screenshot below. Running the script with the /unpkey parameter removes the existing license and forces the user/client to re-register.
2016-07-13_21-41-40

So – all good? The only challenge now was that he had over 200 clients to run the script on.

To help him automate this, I wrote a simple PowerShell script as a wrapper around OSPP.vbs to automate the key deactivation. It simply locates OSPP.vbs from the installation folder(s), fetches the key(s) and last removes all existing activations. Please note that it needs to run elevated and that it removes ALL activations on the machine.
2016-07-13_21-54-06

<#
    .SYNOPSIS
    This script locates OSPP.vbs and removes all product keys to trigger O365 reactivation. It will remove ALL product keys.
    .NOTES
    File Name: 
    Author   : Johan Dahlbom, johan[at]dahlbom.eu
    Blog     : 365lab.net
    The script is provided “AS IS” with no guarantees, no warranties, and they confer no rights.
#>
#Check that the script runs with privileged rights
if (-not([Security.Principal.WindowsPrincipal] [Security.Principal.WindowsIdentity]::GetCurrent()).IsInRole([Security.Principal.WindowsBuiltInRole] "Administrator")) {
    Write-Warning "You need to have Administrator rights to run this script!`nPlease re-run this script as an Administrator in an elevated powershell prompt!"
    break
}
#Find OSPP.vbs path and run the command with the dstatus option (Last 1...)
$OSPP = Resolve-Path -Path "C:\Program Files*\Microsoft Offic*\Office*\ospp.vbs" | Select-Object -ExpandProperty Path -Last 1
Write-Output -InputObject "OSPP Location is: $OSPP"
$Command = "cscript.exe '$OSPP' /dstatus"
$DStatus = Invoke-Expression -Command $Command

#Get product keys from OSPP.vbs output.
$ProductKeys = $DStatus | Select-String -SimpleMatch "Last 5" | ForEach-Object -Process { $_.tostring().split(" ")[-1]}

if ($ProductKeys) {
    Write-Output -InputObject "Found $(($ProductKeys | Measure-Object).Count) productkeys, proceeding with deactivation..."
    #Run OSPP.vbs per key with /unpkey option.
    foreach ($ProductKey in $ProductKeys) {
        Write-Output -InputObject "Processing productkey $ProductKey"
        $Command = "cscript.exe '$OSPP' /unpkey:$ProductKey"
        Invoke-Expression -Command $Command
    }
} else {
    Write-Output -InputObject "Found no keys to remove... "
}

Hope this helps you if running in to this issue and as always – let me know if you have any questions!

/Johan
Domain Join AzureRM VM’s with PowerShell

Until we have decommissioned all ‘legacy’ systems, we are still stuck in the need of joining our on-premises Active Directories for most of our servers. Deploying VM’s in Azure with the recommended deployment model Resource Manager makes it really easy to automate everything including the domain join process using JSON-templates deploying the resources.

In that case, you just define the JsonADDomainExtension for the VM’s that you want to join the domain as below:
2016-02-24_22-58-55
You also find an example on how to use it here

However, a couple of weeks ago, I had a customer that had provisioned over 25 VM’s using AzureRM PowerShell instead of using JSON-templates. This is of course a lot better than if they would have done it manually through the portal, but unfortunately they had missed to join the domain in the deployment script.
To help them avoid doing manual labour, I wrote a small function that uses the same JsonADDomainExtension to automate the process of joining the already provisioned machines. The function has the join option set to 3 by default, which means it will create the AD object for the machine. It will also reboot the VM automatically.

HOW TO USE IT
If you simply want to join one Azure VM to the domain, you can simply run the function and specify parameters as in the screenshot below. It will automatically prompt for domain join credentials if not specified.
2016-02-25_00-02-38

    Add-JDAzureRMVMToDomain -DomainName corp.acme.com -VMName AMS-ADFS1 `
                            -ResourceGroupName 'ADFS-WestEurope' -Verbose

You can also check out the extension in the portal as below:
2016-02-25_00-03-26
Joining multiple machines is almost as easy, if you want to pick your selection I recommend using Out-GridView with the -PassThru parameter, as also noted in one of the examples.
2016-02-25_00-20-21

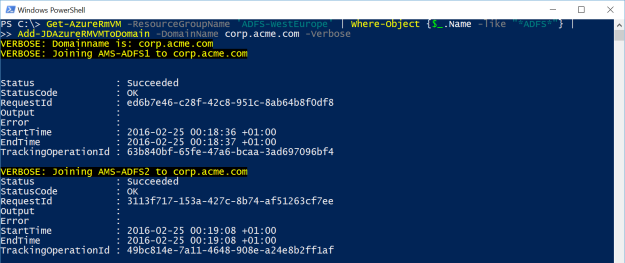
Get-AzureRmVM -ResourceGroupName 'ADFS-WestEurope' | Where-Object {$_.Name -like '*ADFS*'} |
    Add-JDAzureRMVMToDomain -DomainName corp.acme.com -Verbose

Add-JDAzureRMVMToDomain

function Add-JDAzureRMVMToDomain {
<#
.SYNOPSIS
    The function joins Azure RM virtual machines to a domain.
.EXAMPLE
    Get-AzureRmVM -ResourceGroupName 'ADFS-WestEurope' | Select-Object Name,ResourceGroupName | Out-GridView -PassThru | Add-JDAzureRMVMToDomain -DomainName corp.acme.com -Verbose
.EXAMPLE
    Add-JDAzureRMVMToDomain -DomainName corp.acme.com -VMName AMS-ADFS1 -ResourceGroupName 'ADFS-WestEurope'
.NOTES
    Author   : Johan Dahlbom, johan[at]dahlbom.eu
    Blog     : 365lab.net
    The script are provided “AS IS” with no guarantees, no warranties, and it confer no rights.
#>

param(
    [Parameter(Mandatory=$true)]
    [string]$DomainName,
    [Parameter(Mandatory=$false)]
    [System.Management.Automation.PSCredential]$Credentials = (Get-Credential -Message 'Enter the domain join credentials'),
    [Parameter(Mandatory=$true,ValueFromPipeline=$true,ValueFromPipelineByPropertyName=$true)]
    [Alias('VMName')]
    [string]$Name,
    [Parameter(Mandatory=$true,ValueFromPipeline=$true,ValueFromPipelineByPropertyName=$true)]
    [ValidateScript({Get-AzureRmResourceGroup -Name $_})]
    [string]$ResourceGroupName
)
    begin {
        #Define domain join settings (username/domain/password)
        $Settings = @{
            Name = $DomainName
            User = $Credentials.UserName
            Restart = "true"
            Options = 3
        }
        $ProtectedSettings =  @{
                Password = $Credentials.GetNetworkCredential().Password
        }
        Write-Verbose -Message "Domainname is: $DomainName"
    }
    process {
        try {
            $RG = Get-AzureRmResourceGroup -Name $ResourceGroupName
            $JoinDomainHt = @{
                ResourceGroupName = $RG.ResourceGroupName
                ExtensionType = 'JsonADDomainExtension'
                Name = 'joindomain'
                Publisher = 'Microsoft.Compute'
                TypeHandlerVersion = '1.0'
                Settings = $Settings
                VMName = $Name
                ProtectedSettings = $ProtectedSettings
                Location = $RG.Location
            }
            Write-Verbose -Message "Joining $Name to $DomainName"
            Set-AzureRMVMExtension @JoinDomainHt
        } catch {
            Write-Warning $_
        }
    }
    end { }
}

I hope that everyone is using properly configured JSON-templates provisioning Azure Resources nowdays, but in case you don’t, I hope this function can be helpful.
As always, let me know if you have suggestions or questions!

/Johan